Determining the best method of commercial bike rack installation starts with knowing installation surface. Depending on the surface, there are different installation methods you can use to secure the bike rack to the surface.
Click the surface type to jump to that section.

How to Install a Bike Rack in Concrete
By far, concrete is the best surface material for installing bike racks.
This is also the most secure option for installing a bike rack as well as the least expensive.
The main determination with concrete is whether you will install the bike rack by encasing part of the rack in concrete, called an in-ground mount. Or if you will install the bike rack to an existing slab of concrete - known as a surface mount.
Select the installation method for more details and step-by-step instructions.
Selecting Bike Racks for the Installation Method
When specifying bike racks or placing an order, it's important to select a bike rack that matches the intended installation method.
Reason being, the same type of bike rack would be manufactured differently based on how it will be installed.
For example, if you were to select a U Bike Rack with an in-ground mount, it will have longer leg posts to account for the portion placed below the surface and encased in concrete.
Surface mount bike racks on the other hand have flanges attached to the end of the leg posts. If you were to try and install these bike racks in the ground, the remaining portion of the rack above the surface would be too short and could render the bike rack useless.
How to Install a Bike Rack on Asphalt
With asphalt surfaces, like an existing parking lot, you do not want to install directly into the asphalt.
This material does not hold anchors well enough as they can easily be pried from the surface. If a bike rack is able to be removed from the surface it is mounted to, it becomes useless as the bike lock can simply be slid off the rack and now the bicycle can easily be stolen.
Your first option for installing bike racks on asphalt is to actually cut out an area of the asphalt and area below the surface to do an in-ground mount. You would then pour concrete footings, encasing a portion of the legs of the bike rack in concrete, to securely mount the rack.
A second option would be to use racks on rails. With this, bike racks are mounted to a metal c-channel or rails. The entire unit can then be left freestanding on the asphalt.
Freestanding bike racks could also be considered. These bike racks feature enclosed loops where bicycles can be securely locked to the rack and the lock can't be slid off the rack. This eliminates the need for the rack to be mounted to the surface.
How to Install a Bike Rack on Pavers
When attempting to install a bike rack to a surface covered with pavers, like asphalt, you would not want to install directly to the pavers.
Again, using the bike rack as leverage, thieves and vandals can too easily pry out pavers and then slide the bike lock off of the rack.
The best way to install a bike rack with a surface of pavers is to remove the pavers where the legs of the bike rack are to be installed. Then core out an area below the surface and use an in-ground installation, using concrete to encase the legs of the bike rack.
Bike racks on rails or freestanding bike racks would also be options in this situation.
How to Install a Bike Rack on Natural Surfaces
For more natural surfaces - like dirt, grass, crushed limestone - pouring concrete footings for an in-ground installation is the best decision. A freestanding bike rack or bike racks on rails would be another option.
Do not attempt to surface mount bike racks to these surfaces. The anchors will not hold.
Bike Rack Installation Methods
In-ground Installation
In general, in-ground installation of bike racks involves creating a hole in the surface where the leg(s) will be placed, inserting the leg(s) and then encasing the leg(s) in concrete.
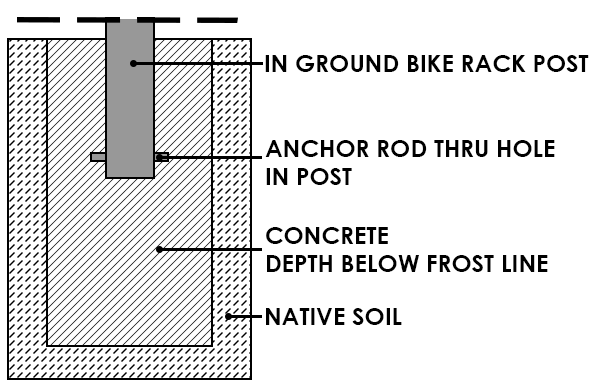
Most often, an in-ground mounting method would be chosen when placing the bike rack in an area where an existing concrete slab does not exist. Like natural soil surfaces, for example.
It is one of the most permanent and tamper-resistant mounting methods.
In-ground Post Installation Instructions
Materials List
- Shovel or another tool to dig out a hole
- Anchor rods (supplied by Madrax along with bike rack)
- Object or framework to suspend fixture
- Concrete
- Level
Installation Instructions
1. Prepare a hole for each leg of the rack that is to be mounted. Generally, the hole should be 6 inches in diameter at a minimum.
Refer to the manufacturer’s installation instructions for specific hole size needed.
The hole will then need to be dug to a depth mandated by local codes. The depth of the hole at a minimum should be below the appropriate frost level of the climate.
2. Insert the anchor rods provided by the manufacturer into the holes at the bottom of the leg(s).
NOTE: If the fixture includes a grout cover, slide it high up on the leg and temporarily tape it so it is out of the way.
3. Insert the leg(s) into the hole(s).
See the instructions of your product for the specific mounting depth.
4. Suspend the fixture on a frame or other object to properly plumb and orient the legs in the hole.
5. Pour the concrete into the hole(s). Allow to set.
If applicable, put the grout covers in place.
Surface Mount Installation
A surface mount is the recommended installation method with existing concrete surfaces. This mounting method involves drilling holes into the existing concrete slab and then inserting bike rack anchors into the holes drilled in the concrete to secure the bike rack to the surface.
Surface Mount Anchors
With a surface mount installation, you will need to determine what type of anchor to use.
There are three common anchors used with surface mount installations – spike, wedge and drop-in.
When you should use each one depends on how permanent of an installation you would like.
Spike Anchors
A spike anchor is a single, solid object inserted through the flange on the bike rack and into the drilled hole in the concrete. Because of its shape, it remains lodged in the concrete.
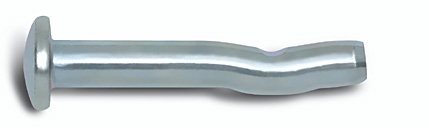
This anchor is nearly impossible to remove. Making it the most secure. The concrete surrounding the anchor will need to be chipped away to remove and uninstall the bike rack.
Pros: Ease of installation, Most Secure
Cons: Concrete would need to be destroyed to remove bike rack
Jump to: Spike Anchor Installation Instructions
Wedge Anchors
A wedge anchor is a single element that is inserted into the hole in the concrete with the male, threaded portion extending above the concrete. A nut is used to tighten the fixture to the surface.
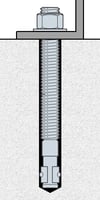
This is a good option if you plan to temporarily remove the bike rack. This could be done to clean the surface.
When using wedge anchors to install bike racks, it is recommended tamper-proof nuts be used. A standard nut on a wedge anchor can easily be removed by thieves with common hand tools.
If the bike will be removed in the future and the anchor will no longer be needed, the portion of the wedge anchor above the concrete can be sawed off, leaving it flush with the surface.
The wedge anchor can also be pounded into the concrete. But the hole will need to be drilled two times the length of the anchor before installing the wedge anchor if plan on doing this.
Pros: Bike racks can be removed without damaging concrete
Cons: Could be tampered with to make bike racks unsecure; When bike racks are removed, the bolt will remain protruding from the surface causing unsafe conditions
Jump to: Wedge Anchor Installation Instructions
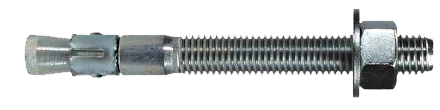
Drop-in Anchors
A drop-in anchor involves an anchor element that is placed into a hole that has been drilled in the concrete. A separate bolt is then inserted into the anchor that expands and sets the anchor. A nut is used to tighten the fixture to the surface.
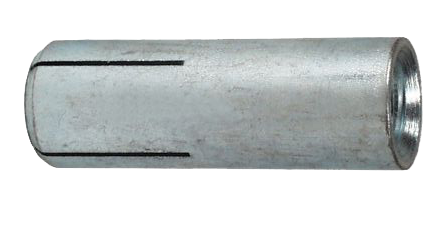
This type of anchor is most advantageous if the bike rack will be removed permanently or for a longer duration of time - like during a winter season. The bolt simply unscrews from the anchor, leaving a flat surface.
It is recommended a tamper-proof nut be used with these anchors.
Pros: Bike racks can be removed and the surface will remain flat
Cons: Bolts are only tamper proof and could be removed by thieves to remove the bike rack
Jump to: Drop-in Anchor Installation Instructions
Spike Anchor Installation Instructions
Materials List
- Hammer drill
- Carbide tipped drill bit
- Spike anchors
- Hammer
- Wrench
- Safety glasses
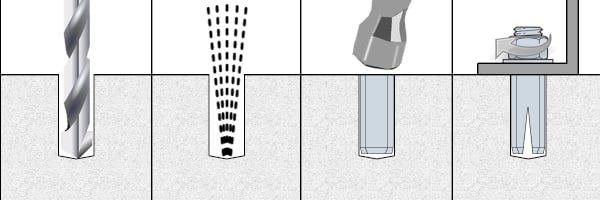
1. Place bike rack in the desired installation spot. Mark locations of holes by marking through the mounting holes in the flange.
2. Remove bike rack from installation spot.
3. Drill holes using drill bit the same diameter as spike anchor.
4. Blow out or remove as much concrete dust from the hole as possible.
5. Insert wedge anchors into the holes in the concrete.
6. Hammer spike anchor into hole deep enough where flange is flush to the surface.
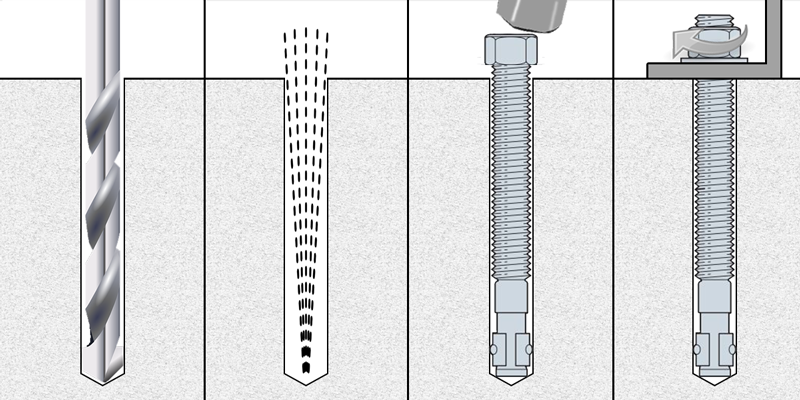
Wedge Anchor Installation Instructions
Materials List
- Hammer drill
- Carbide tipped drill bit
- Wedge anchors
- Hammer
- Wrench
- Safety glasses

Installation Instructions
1. Determine correct wedge anchor length. Do this by adding minimum embedment depth – defined by the diameter of the wedge anchor being used – and material thickness of flange on site furnishing footing.
For example, a 3/8” wedge anchor with a minimum embedment depth of 1-1/4” should be drilled 1-5/8” at a minimum.
It’s suggested the hole actually be drilled an additional 1” to account for dust that will settle into the hole. Or double the anchor length to allow the option for the anchor to be pounded fully into the hole.
2. Place bike rack in the desired installation spot. Mark locations of holes by marking through the mounting holes in the flange.
3. Remove bike rack from installation spot.
4. Drill holes using drill bit the same diameter as wedge anchor.
5. Blow out or remove as much concrete dust from the hole as possible.
6. Insert wedge anchors into the holes in the concrete.
7. Place nut on wedge anchor to protect threads during installation.
8. Hammer wedge anchor into hole deep enough so that threads are below surface of base material.
9. Remove nuts.
10. Place bike rack back in desired location, threading anchor through holes in flanges.
11. Place washer on anchors, then nuts. Tighten nuts turning approximately three or four full turns.
Drop-in Anchor Installation Instructions
Materials List
- Hammer drill
- Carbide tipped drill bit
- Wedge anchors
- Hammer
- Wrench
- Safety glasses
1. Place bike rack in the desired installation spot. Mark locations of holes by marking through the mounting holes in the flange.
2. Remove bike rack from installation spot.
3. Drill holes using a 3/4" drill bit for a 1/2" anchor. Or a 5/8” drill bit for a 3/8” anchor.
CAUTION: Oversized holes will make it difficult to set the anchor and will reduce the anchor's load capacity.
4. Blow out or remove as much concrete dust from the hole as possible.
5. Insert cone end of anchor into hole and tap flush to surface.
6. Place bike rack back in desired location. Insert bolt through holes in flanges and into anchor.
Note: The anchor should engage a minimum of 2/3 of the bolt threads.
7. Place nut on bolt and tighten.
The anchor can also be expanded using a Hollow-Set Tool. If Hollow-Set Tool is used, thread anchor onto tool prior to tapping into anchor hole. When flush with surface, turn tool clockwise to tighten.
Release tool from set anchor by turning counterclockwise. Fixture can then be attached.
Note: The information in this post is meant to provide a general understanding of common installation methods for commercial bike racks. Please refer to the documentation that accompanies your product or local codes for specific installation instructions. Always make sure to wear appropriate safety equipment and following any safety instructions from manufacturer when installing anchors.
Related Resources
- [Shop] Drop In Anchors
- [Shop] Spike Tamper Resistant Anchors
- [Shop] Removable Anchors
- [Article] Bike Rack Materials & Finishes
